
Introduction
Energy Sistem™ thanks you for buying your new TDT SD3. We hope you will enjoy it.
The next sections will offer you a general overview of your new device and its main features.
Before you start using your TDT SD3 we recommend you to read this manual and familiarize yourself with it. It only takes a few minutes and it will help you to enjoy your device with maximum performance.
Care and maintenance
- Do not expose your SD3 to impacts, dust, direct sunlight, humidity or high temperatures.
- Do not use corrosive nor abrasive cleaning products.
- Keep the device clean and dust free using a soft, dry cloth. Always disconnect the device from the power supply before cleaning.
- The slots and openings of your TDT SD3 are made for ventilation. Do not cover or block them.
- Do not disassemble the device. Any repairs must be carried out by Energy Sistem Technology S.A. qualified personnel only.
- Your TDT SD3 requires no maintenance. Make sure the batteries are disposed safely. Consult the local authorities about the waste management legislation.
Main features
- DVB-T tuner for MPEG-2 system.
- 360° swivel connector to adjust the position and save space when you connect it to your TV without cables thanks to the SCART connector.
- Use it through its USB port to play different video formats: SD (DivX, Xvid, AVI, MPG), audio (MP3, WMA) and photos (JPEG, BMP, GIF).
- Record DVB-T in MPEG-2 format with digital quality through USB devices. Recording manager.
- Timeshift function to pause and resume the DVB-T broadcast.
- Tune in the radio with digital quality.
- Electronic programme guide (EPG) with event information (recording/notification)
- Dynamic channels mosaic display function (MSM)
- Multilingual OSD menu
- Teletext (VBI)
- Selectable subtitles between digital channel and teletext.
- Channel management: favourites, move, lock, sort and parental control.
- Parental control.
- Automatic switch off (ECO) and timer (SLEEP).
- Games and applications included (Calculator, calendar, connect 5)
- Software updated via USB port.
- Automatic and manual TV and radio channel search, with storage capacity up to 1000 channels.
- OFDM 2K/8K mode.
- Bandwidth: 7/8 MHz.
- File system: FAT/FAT32.
- Efficient energy consumption in standby mode contributing to the sustainability of the environment.
Product contents
- TDT SD3
- Remote control unit
- IR receiver cable
- USB Host cable
- AC/DC (Europlug) 100-240V AC 50-60Hz DC 5V 1.5A power adapter
- Quick guide
General overview

- SCART connector.
- 360º swivel joint.
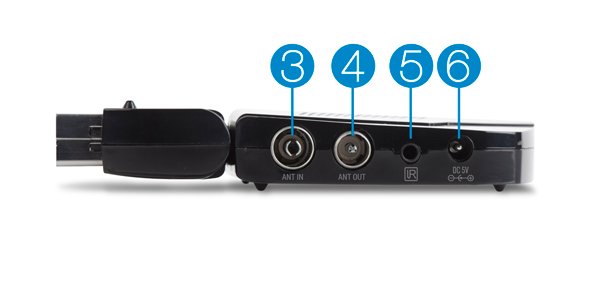
- Antenna input connector. Connect it to the external TV antenna.
- Antenna output connector. Use it if you need to transfer the antenna signal from your SD3 to another device.
- IR receiver cable connector for the remote control. This cable receives the signal from your SD3.
- AC/DC power adapter cable connector.
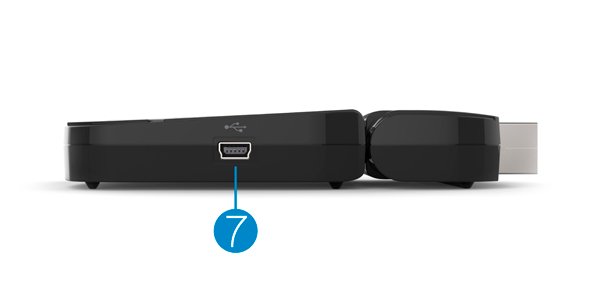
- USB Host cable connector. Connect your external USB devices to play multimedia content or record from the DVB-T.
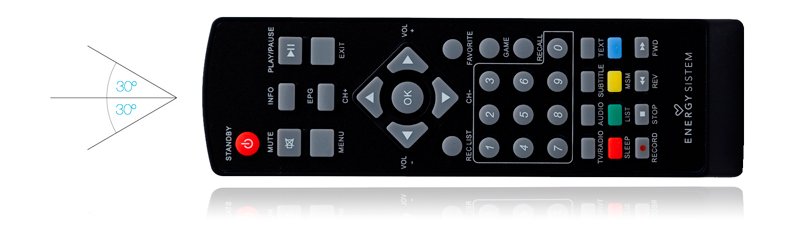
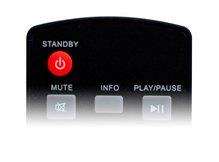
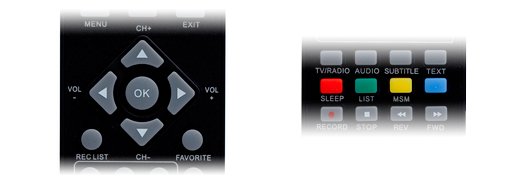
Remote control

- STANDBY: Switch between power on and standby mode.
- MUTE: Turn sound on or off.
- MENU: Show main menu
- CH+/-: It allows you to change the channel. Up and down arrow.
- VOL+/-: It allows you to adjust the volume. Left and right arrow.
- RECLIST: It shows you the stored recordings list.
- NUMBER BUTTONS: Use them to manually enter channels numbers, or numbers in the menu.
- TV/RADIO: Switch between TV channel selection or radio stations. AUDIO: Select from the audio tracks
- RED: Sleep. Programmed shut-down/Red selection button. GREEN: List. Channel list. Green selection button.
- RECORD: Manual recording of TV channels. STOP: Stop recording or playing.
- INFO: Screen information about the channel you are watching. Press several times to show more info/disable.
- PLAY/PAUSE: Pause/Resume the playback of your TV or the multimedia content (an external storage USB device is required)
- EXIT: Return/Exit the menu.
- EPG: Electronic programme guide.
- OK: Selection/confirm button.
- FAVOURITE: Access to favourite channels.
- GAME: Access to games and applications (Gomoku, Calendar and Calculator)
- RECALL: Change between current and previous channel.
- SUBTITLE: Enable or disable the subtitles. TEXT: Access to the teletext in the channels providing this service.
- YELLOW: MSM. Dynamic channels mosaic/Yellow selection button. BLUE: Blue selection button.
- REV: Fast rewind when recording or multimedia. Press several times to select the speed. FWD: Fast forward when recording or multimedia. Press several times to select the speed. If the Time Shift function is connected, use "REV" and "FWD" to move around the DVB-T broadcast. For more information about "Time Shift" go to "Multimedia" > "My Recordings".
To use the remote control, point it to the front part of the receiver cable. The receiving cable has a sensor with an adhesive surface on the one end to place it on the front of the television. Before adhering it, and to ensure a secure installation, make sure the surface is completely smooth, clean it with alcohol and dry it completely. Remove the protection from the adhesive material and paste it on a point near the centre of your TV.
Make sure the field of vision between the remote control and the receiver is free of obstacles to ensure the best reception. The remote control has one IR transmitter in the upper part with a range of up to 7 metres from the receiver at an angle of up to 30º in both directions.
If the remote control range becomes lower, and the field of vision between the remote control and the receiver is free of obstacles, maybe the batteries are empty. We recommend replacing the batteries.
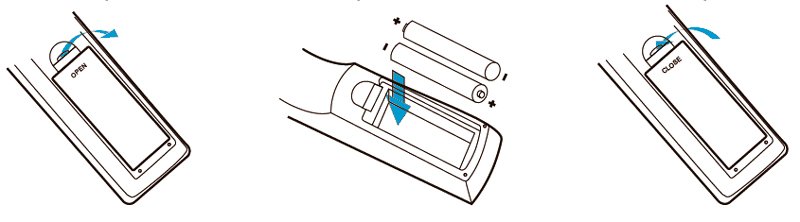
Battery installation.
Remove the battery compartment cover in the remote control and slide two AA batteries into it. As shown in the following picture.
Recomendaciones acerca de las baterías.
- Keep the batteries out of the reach of children.
- Do not try to recharge empty batteries. Do not expose to fire, disassemble or short circuit them.
- Change the batteries once a year for security reasons.
- Change both batteries at the same time. Do not mix battery types.
- Remove the batteries if you won't be using the remote control for an extended period.
- Dispose of used batteries according to your local environmental laws and guidelines.
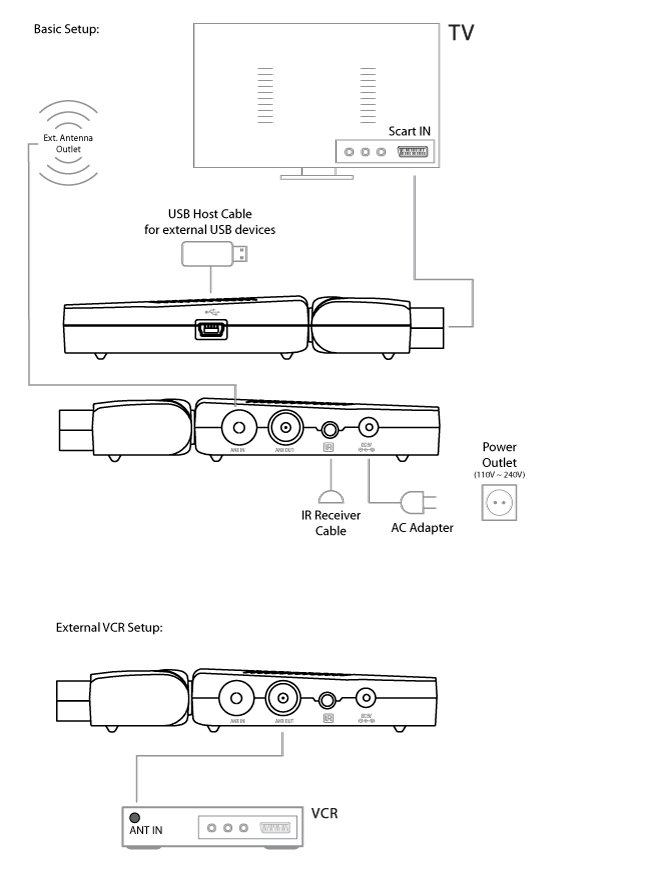
Connection diagram
Caution: Check that the voltage in the power outlet is appropriate for the power adaptor of your TDT SD3, that is 110 to 240 V. Disconnect the devices from the energy network before connecting it. Check the information given by the manufacturer of your TV if necessary.
Optionally, you can extend the antenna signal to another device, as a videorecorder, by connecting another antenna cable to your SD3 Ant OUT connector.
Connecting your TDT SD3.
Switch on and off
To turn on the SD3 press the power button "STANDBY" (8) on the upper left part of your remote control. You will see a green light in the IR receiver that indicates that it is turned on.
In order to turn off the device, (Standby mode) hold the power button "STANDBY" (8). The device will enter the standby mode and the IR receiver light will turn red. In this mode, your TDT SD3 uses the "Eco Energy" technology that keeps the device in standby mode with low power consumption.
If you are not using the device for an extended period, we recommend to completely turn off the device, disconnecting it from the energy network.
First use / Start settings
When first installing or restoring to factory settings, your SD3 will automatically show the settings screen for the initial setup of the localization, menu language, audio, subtitles, etc. and start the channel search.
Press "UP/DOWN" (11) in your remote control to move around and "LEFT/RIGHT" (12) for the settings.
Press the "RED" button (16) in the lower part of your remote control to start the automatic channel installation. When finished, the device will save the settings and channels found, and you will enjoy the DVB-T channels or radio stations.
Menú principal
While you enjoy your favourite TV and radio channels, press "MENU" (10) to enter the main menu of your SD3.
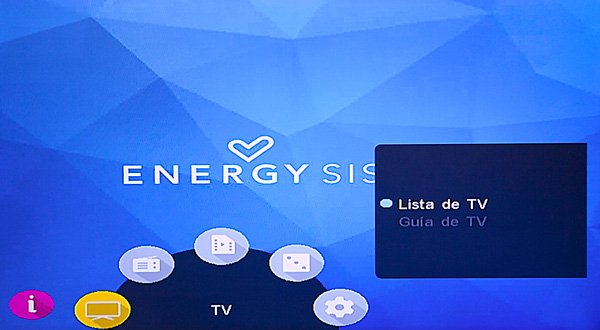
In this screen you will find the following submenus:
- TV
- Radio
- Multimedia
- Applications
- Settings
TV and Radio
Receiving the DVB-T broadcast you will find two types of channels, TV and radio. The operation of the Channel list and the Electronic guide remains identical for both radio and TV. In this section we will explain the operation of the TV version, that you will be able to apply to the radio version.
TV channel list.
In this list you will find the options of organisation, lock and editing the channel list.
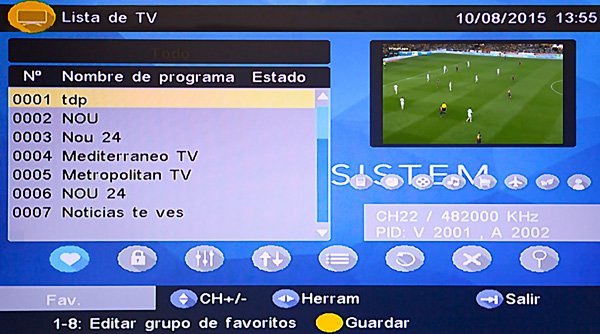
You can move between the channel list using the "UP / DOWN" (11) buttons, and move between the tools by pressing "LEFT / RIGHT" (12) buttons.
-
Favourites: you can move through the channel list using the "UP/DOWN" (11) buttons and choose your favourite channels, sorting them in up to 8 different categories pressing in the number buttons <1 to 8> (14) to include or remove a channel from a favourites category ("News", "Sports", "Cinema", "Music", "Shopping", "Travel", "Lifestyle", "Documentaries").
-
Lock: Press the "OK" (22) to enable or disable the selected channel lock. In case you have enabled the password lock in "Settings, Password, Channel lock" it will ask you for a code each time you select to watch this channel.
- Editing: This option allows you to edit the channel name. The maximum length for the character entry is 20.
- Press "LEFT/RIGHT" (12) in your remote control to select the edit option. Then press "UP/DOWN" (11) to select the channel you want to edit.
- Press "OK" (22) to show the channel's information, press "OK" (22) again to enter the edit mode.
- Press "UP/DOWN" (11), "LEFT/RIGHT" (12), the number buttons <0-9> (14) and "RED/GREEN" (16) to enter the characters.
- Press "OK" (22) to complete editing and return to the channel information screen.
- Press "RED" (16) to save the changes and return to the channel list, or "EXIT" (29) to exit to discard the changes.
-
Move: It allows you to change the position of the channels in the list.
Note: This function will not be available when the "LCN" (Logical Channel Number) option is enabled in "Settings, Installation, LCN".
-
Order: It allows you to sort the channels alphabetically or pay/free.
Note: This function will not be available when the "LCN" (Logical Channel Number) option is enabled in "Settings, Installation, LCN".
-
Skip channels:you can skip channels when using the the "CH+/CH-" buttons (11). Press "OK" (22) to turn this option on/off. Enter the number of channel manually using the number buttons from 0 to 9 (14) to see all channels.
-
Delete: removes the selected channel from your channel list permanently. In order to recover it later on, you will have to make a new channel search.
Press "OK" (22) or the "GREEN" button (16) to choose between removing one or all channels.Important: This function will not be available if the password is on and you have not entered it correctly.
- Search: enables to enter a key word to make a channel search.
-
- Press "LEFT/RIGHT" (12) to select the search option.
- Press "OK" (22) to access the search page.
- Press "UP / DOWN" (11), "LEFT / RIGHT" (12), the number buttons from <0 to 9> (14) and the "RED / GREEN" button (16) to enter the letters.
- Press "OK" (22) to start searching. Once the search is finished, a list of channels that match your search criteria will appear.
- Press the "GREEN" (16) or "YELLOW" button (27) to move through the list of search results.
Electronic Programme Guide (EPG)
The electronic programme guide enables users to obtain information about the weekly programmes of tv channels. Press the EPG button (21) on your remote control to access the guide window.
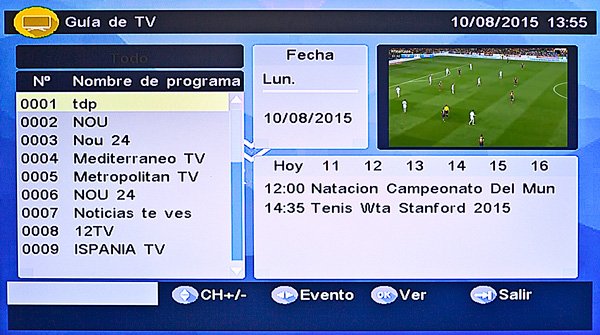
- Press "UP / DOWN" (11) to change channels.
- Press "LEFT / RIGHT" (12) to change the programme or to choose another date.
- Press "OK" (22) to display the information of the selected programme.
- Press "EXIT" (20) to return to the previous menu or to exit.
- Press the "RED" button (16) to enter the list of scheduled events and "OK" (22) para incluir el programa seleccionado. to add the selected programme to the list. In case that two events are scheduled at the same time, a warning message will appear on screen. Otherwise, the event will be added to the Timer.
Multimedia
Once the multimedia menu is opened, you will be able to display the images, music and videos saved on your USB device. In order to access this menu, you will first need to connect your USB device to the USB port of your TDT SD3 using the USB host cable that is included.
Your USB device must have a FAT or FAT37 format in order for your TDT SD3 to recognize it correctly.
My Album
My Album menu enables you to display images in JPEG, BMP and GIF formats.

Images in the device root folder will be shown as thumbnail view. In case there are no images in this folder, the folder structure view will be shown and thus, you will be able to choose the folder you prefer. You can access the folder view mode by pressing the "BLUE" button (27) of your remote control. Press "EXIT" (20) to return to the thumbnail view.
You can press the "UP / DOWN" (11) and "LEFT / RIGHT" arrow buttons (12) to change from one thumbnail (images and folders) to the other. Press "OK" (22) to display the selected image. Press "OK" (22) once again to start the slideshow mode. The display mode shows all images saved on a folder automatically. Press "INFO" (18) to see all available control settings.
Zoom
Press the "RED" button (16) to zoom in or out the image. You can choose between 25%, 50%, 100%, 150% and 200%.
When the image has been zoomed to more than 100%, you can move around the screen using the arrow buttons (11) and (12).
Rotation
Press the "LEFT / RIGHT" arrow buttons (12) to rotate the image clockwise other anticlockwise.
Press the "YELLOW / BLUE" button (27) to mirror the image, flipping it horizontally or vertically.
Presentation
Press "OK" (22) to display the selected image. Press it once again to start the presentation mode.
Press the "RED" button (16) to pause or resume the presentation.
You can listen to background music during the presentation. Press the "GREEN" button (16) to select the audio file.
Press the "YELLOW" button (27) to select the AutoRepeat mode.
Press the "BLUE" button (27) to adjust the range of time between images.
You can change from one image to another manually during the presentation by pressing the corresponding "UP / DOWN" buttons (11).
My Music
Through this menu, you will be able to listen to your USB sticks music files in MP3 and WMA formats.
You will be able to see the progress bar and a frequency analyzer on screen while the music is playing.
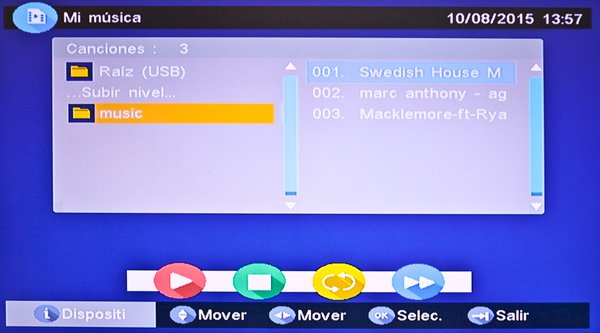
Press the "UP / DOWN" (11) and the "LEFT / RIGHT" arrow buttons (12) to move through folders and files and press "OK" (22) to select.
Press the "RED" button (16) to pause or resume the music.
Press the "GREEN" button (16) to stop.
Press the "YELLOW" button (27) to select the AutoRepeat mode.
Press the "BLUE button (27) to adjust the speed (x2, x3, x4 or standard) of the fast forward function..
Press the "LEFT / RIGHT" arrow buttons (12) while listening to music to adjust the volume.
My films
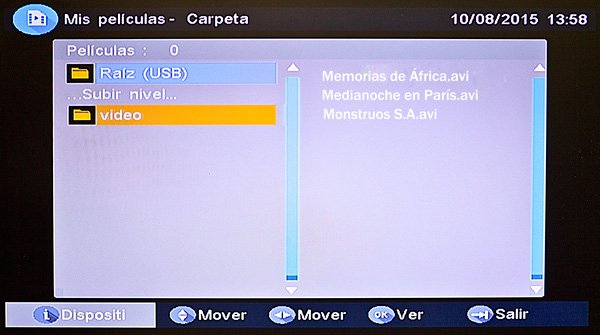
Through My films menu, you will be able to play the video files in MPEG2, Divx and Xvid formats with standard resolution (SD) saved on your USB stick. Not all formats nor all video or audio file containers are compatible.
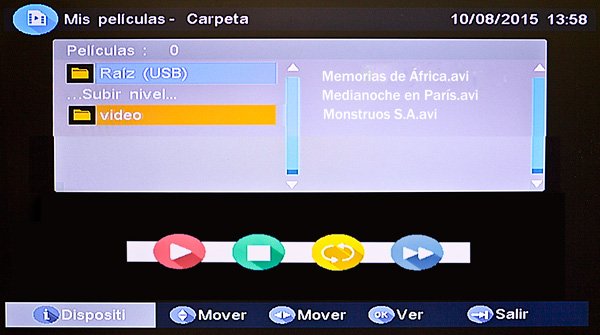
Press the "UP / DOWN" (11) and the "LEFT / RIGHT" arrow buttons (12) to move through folders and files and press "OK" (22) to select folders or play the selected file.
Press "INFO" (18) to see all available control settings.
Press the "RED" button (16) to pause or resume the music.
Press the "GREEN" button (16) to move forward a frame.
Press the "YELLOW / BLUE" button (27) ) to move forward and backward at x2, x4, x8, x16, x32 or standard speed.
My Recordings
Through this menu, you will be able to watch the recorded DVB-T programmes using your USB stick and set the recording and managing tools for storage units.
Please take into account that the USB unit must have a FAT or FAT32 format in order for your TDT SD3 to recognize it correctly. It is probable that you will need to format your device through this menu to make it work properly. Use this function carefully because formatting a device means deleting all saved data.
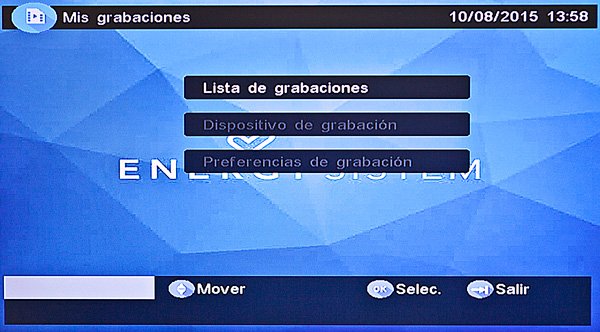
Recording list
This screen shows the list of all recordings saved on the USB storage device. You can access this screen by pressing the "REC LIST" (13) of your remote control.
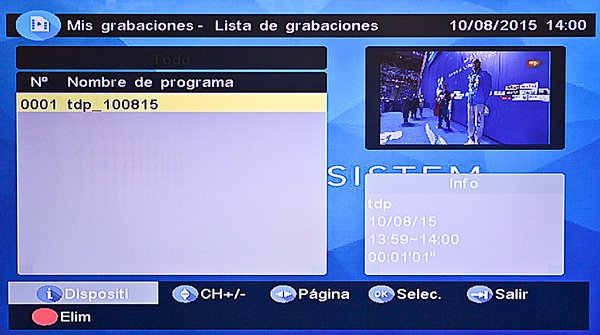
Press "UP / DOWN" (11) ) to move through the list or the "LEFT / RIGHT" (12) arrow buttons to change from one page to the next one.
Press "OK" (22) to play the recording.
Press the "RED" button (16) to delete the recorded programme.
Press "INFO" (18) to change the USB device (in case that you have several storage units connected through a USB hub).
Recording unit
In this menu, you can select the device and the partition in which your TDT SD3 will save the DVB-T recordings.
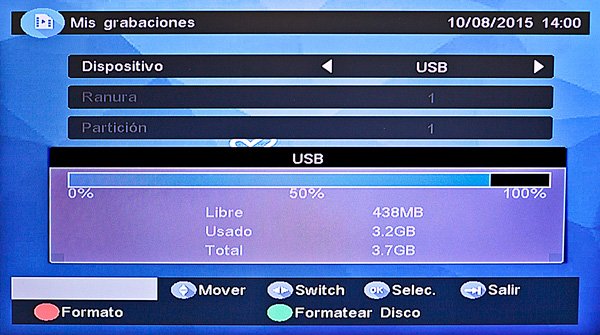
You will be also able to format partitions or whole USB units. We recommend to choose this option if you are going to use a storage unit to make recordings. Nevertheless, keep in mind that the formatting will delete all data saved on the disc or partition.
Press the "GREEN" button (16) to format the whole USB unit.
Press the "RED" button (16) to format a partition of the USB storage unit.
Recording preferences
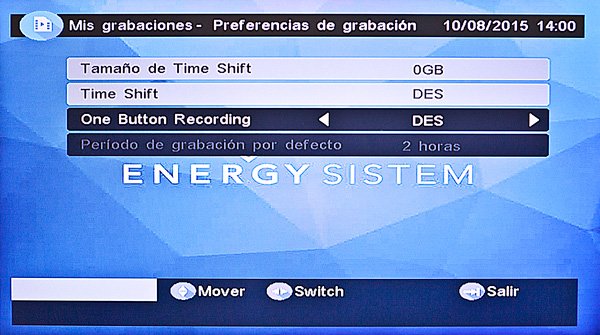
- Time Shift capacity: shows the storage capacity for the "Time Shift" function. This function enables to pause or play in reverse a tv programme and move it forward until you reach the current broadcasting time. This storage capacity is automatically reserved by the system depending on the storage capacity of the connected USB and cannot be modified by the user.
- Time Shift: sets the mode that activates the "Time Shift:" function:
- Pause. You can activate it by pressing the "PLAY / PAUSE" button (19) of your remote control.
- Auto. Always on while the file is being played on television.
- Off. "Time Shift" off.
- One button recording:
- On. The recording starts directly when pressing the "RECORD" button (17) on your remote control.
- Off. By pressing the "RECORD" button (17) ) on your remote control, you will be able to select the recording time in 15 minutes intervals. The recording time chosen by the user will be selected by default.
- Recording time by default: sets the recording time by default from 15 minutes to 8 hours in intervals of 15 minutes.
Accesories
- Gomoku: entertaining five in a row game to put your skill to the test against the device. Press the "UP / DOWN" (11) and "LEFT / RIGHT" arrow buttons (12) on your remote control to set the game mode and the degree of difficulty. Press "OK" (22) to start the game. Press the "UP / DOWN" (11) e "LEFT / RIGHT" arrow buttons (12) to change the position and press "OK" (22) to place the Go pieces.
- Calendar: shows the year, month and day.
- Calculator: simple calculator for your everyday life.
DVB-T operation
Information
In order to display the information bar, press the "INFO" button (18) when watching/hearing digital tv and radio programmes.
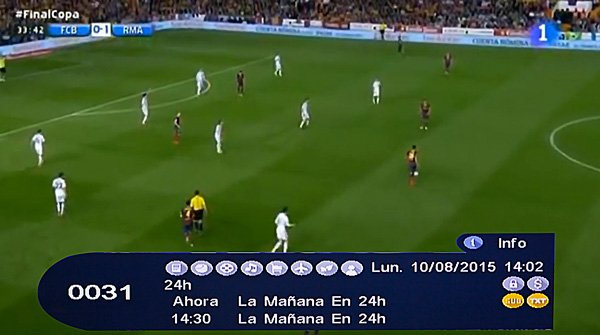
The information bar shows the channels number and name, current time, current and coming programme, teletext information and subtitles as well as channels characteristics and states such as locked, encrypted, favourite. . .
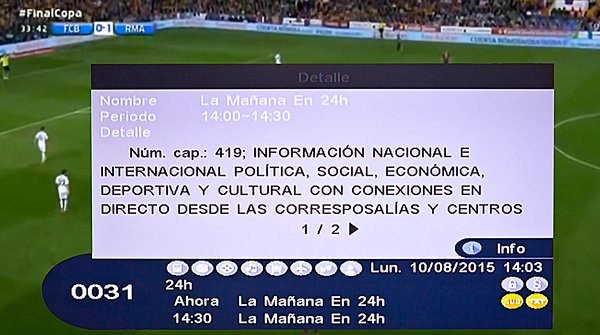
The detailed information of the current programmes will be displayed by pressing a second time the "INFO" button (18).
The technical data of the channel as well as the intensity and quality of the signal will be shown by pressing a third time the "INFO" button (18).
Changing channels
You can change channels by choosing any of the following options:
- By pressing the "CH+" / "CH-" buttons (11).
- By entering the channels number through the number buttons on your remote control (14). If the entered channel number does not exist, no action will take place.
- By pressing the "RECALL" button (25) to return to the previous selected channel. This feature is useful if you are, for instance, watching programmes on two different channels and you want to switch between them.
Adjust the volume
Press the "VOL+" / "VOL-" buttons (12) to adjust the sound volume. Press "MUTE" (9) to turn the sound on or off.
If you adjust the volume while the sound is off (after having used the "MUTE" function), it will turn on automatically.
List of channels
Press "OK" (22) to display the list of channels.
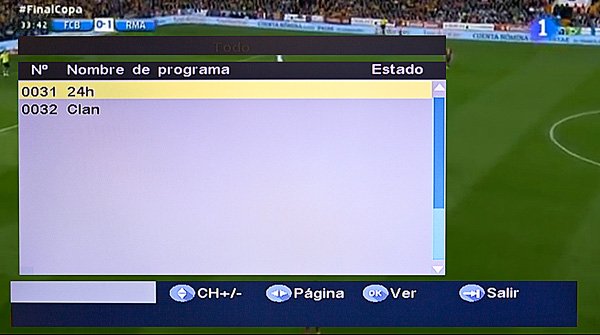
Press the "UP / DOWN" arrow buttons (11) to change channels or the "LEFT / RIGHT" arrow buttons (12) to change from one page of channels to the next one.
Press "OK" (22) once again to show the selected channel.
Audio options of the channels
You can change the channel and the audio track to a different language while watching tv (*).
Press "AUDIO" (15) to show the settings.
(*) The track and audio channel settings are not always available and will depend on the programme you are watching.
Press the "UP / DOWN" arrow buttons (11) to select the channel, the audio track or the sound mode.
Press the "LEFT / RIGHT" arrow buttons (12) to adjust values.
Pause
You can pause the tv broadcast any time by pressing the "PLAY/PAUSE" (19) button on your remote control. You will need to have switched on the "Timeshift" option, which has been explained in the point "Multimedia" under "Recording preferences".
Press once again to resume the broadcast.
If you have turned on the pause option at a certain point in time, you can additionally press "REV" / "FWD" (28) to move through the recording until you reach the current broadcasting time.
Favourites
If you made a selection of your favourite channels in the "TV y Radio" under "Favourite", you can access it by pressing the "FAVOURITE" button (23) on your remote control.
Press the "YELLOW" button (27) to select a group of favourite channels.
Press "CH+" / "CH-" (11) to change channels within the same group of favourite channels.
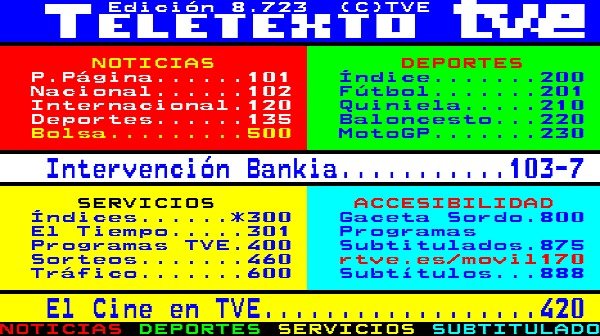
Teletext
Press "TEXT" (26) to access the teletext menu of the channel that you are currently watching. Please take into account that the teletext mode is not always available and will depend on the channel content provider. The style in which the teletext is displayed may vary depending on the channel.
Press the "UP / DOWN" arrow buttons (11) to select the language in which the teletext should be displayed.
Press "OK" (22) to enter the menu of the selected language.
Once the language has been selected, press the number buttons to select a page or the "UP / DOWN" (11) or "LEFT / RIGHT" arrow buttons (12) to change from one page to the next one.
Additionally, you can move through the sections marked in Red, Green, Yellow or Blue by pressing the buttons (16) and (27) of the same colour on your remote control.
Subtitles
Press "SUBTITLE" (26) while you watch TV, multimedia content or My recordings to access the subtitle menu.
The display subtitles option is not always available in all tuned channels and will depend on the content provider.
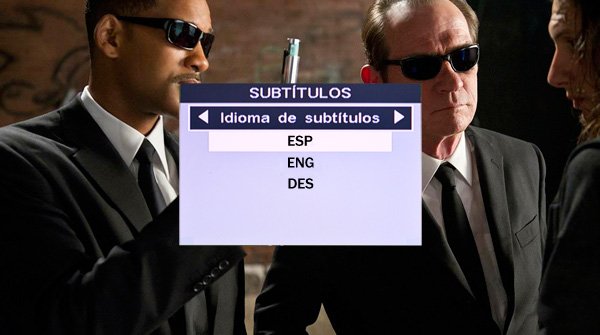
Press the "LEFT / RIGHT" arrow buttons (12) to select the subtitles source: teletext or digital. This option can be useful when one of these options is not available.
Press the "UP / DOWN" arrow buttons (11) to select the subtitles language.
Press "OK" (22) to turn on the subtitles.
Electronic Programme Guide
Press "EPG" (21) on your remote control to access the weekly programme guide. Open the "Electronic programme guide" through the "TV and radio" section to obtain more information.
List of channels
Press the "GREEN" button (16) to access the list of channels. Open the "List of channels" through the "TV y Radio" section to obtain more information.
Dynamic channel mosaic display
Its channel mosaic display (MSM Multi screen mosaic) shows up to 9 channels on screen at the same time. The selected channel will be displayed with moving images while the rest will show a snapshot of the current programme.
This function is useful to channel-hop in a fast way by displaying different programmes on screen.
Press "MSM" (27) to show the dynamic channel mosaic display.
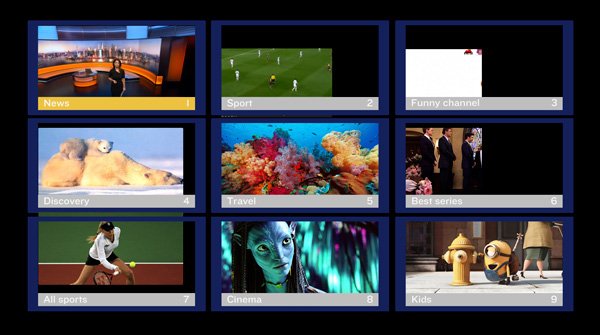
Press the "UP / DOWN" (11) and "LEFT / RIGHT" arrow buttons (12) to move through the channels.
Press "OK" (22) to display the selected channel or press "EXIT" (20) to return to the previous programme.
Settings
Get into settings menu to configure your SD3 and adapt it to your installation type, TV connected settings, and other adjustments
You will find following submenus into settings menu:
- Installation
- TV Settings
- Parental control
- Timer
- Start settings
- Software update
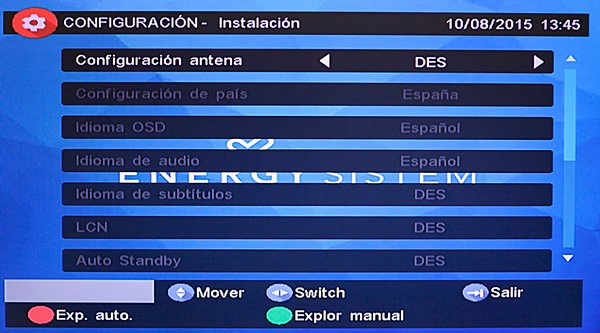
Installation
In this submenu you will configure the antenna, language, localization and channel settings.
-
Antenna setting: Choose if the TDT SD3 supplies the antenna with 5V. The default value is "OFF". Select "ON" if you have an active antenna with signal amplification.
-
Country setting: Choose the country to setup the searching frequencies and the time zone. Changing the regional setting will automatically modify the time zone value and will set the adequate reception values for each localization.
-
OSD Language: Selecciona el idioma para los textos de los menus en pantalla OSD (On Screen Display).
-
Audio language: Set the default language for the audio track. You can later change this settings by pressing on the "AUDIO" button (15) of your remote control during the playback of the content in case more than one track is available.
-
Subtitle language: Set the default language for the subtitles. You can later change this settings by pressing on the "SUBTITLE" (26) button of your remote control during the playback of the content when at least one track is available.
- LCN: Turn on/off the "Logical Channel Number" system. It is a system that exclusively identifies the numbers of the channels. LCN may not be available in your country.
-
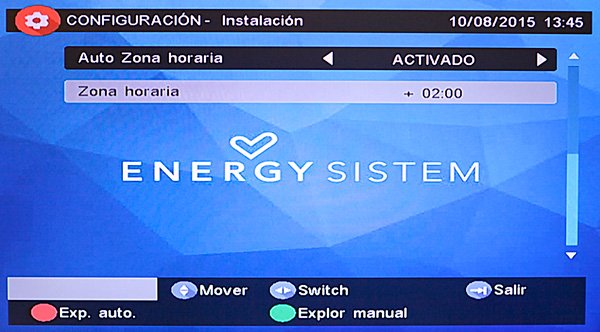
Auto Time Zone/Time Zone: It allows to turn on/off the automatic update of the time zone thanks to the information from the DVB-T broadcast signal. Some countries have more than one time zone, if necessary, you can manually set the time zone turning this setting off and selecting the time zone in the list.
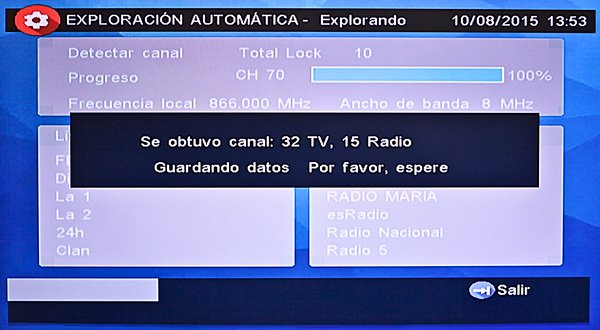
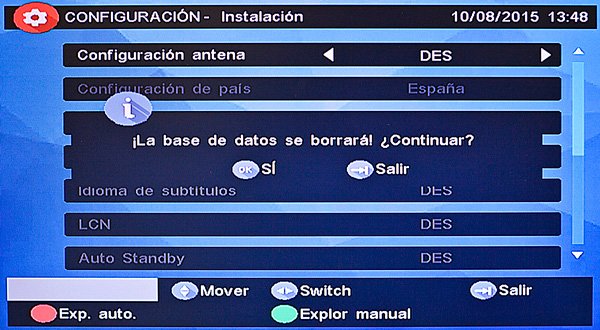
- Auto Scan: This function will erase all the channel previous settings and will restart a new automatic channel search for the frequencies of the selected country. Press the "RED" button (16) in your remote control to start the process, press "OK" (22) in the notification screen to confirm erasing the channels previously memorised and start a new search. The Auto Scan function might require several minutes to complete.
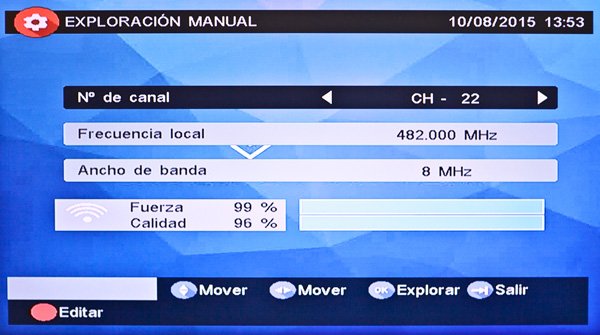
- Manual Scan: This function adds channels to the previously memorised channel list. If you know the frequency and the bandwidth you might want to manually enter the channels. Scanning a determined frequency will erase the previously memorised channels to refresh them with the results of the most recent search. Press the "GREEN" button (16) to show the "Manual Scan" screen and enter the corresponding values to the band you want to scan and press "OK" (22) to start the scan.
TV Settings
In this submenu you will set the options related to the settings of the TV, such as the aspect, format, system, etc.

- TV format:
- 4:3 LB (LetterBox): Select this option if your television has a 4:3 aspect ratio and you want to convert it to 16:9. This conversion causes black bars to appear above and below the image when the broadcasting is 16:9.
- 4:3 PS (PanScan): Select this option if your television has a 4:3 aspect ratio and you want to adjust the image to full screen. This mode zooms in on the image to remove the black bars from the original 16:9 broadcasting, this will also remove the right and the left part of the image.
-
16:9 PB (PillarBox) or 16:9 AUTO: Select this option if your wide screen television has a 16:9 aspect ratio.
-
TV mode: Select PAL, NTSC or AUTO depending on the TV system of your localization. The "AUTO" option is the more convenient in most of the situations.
-
OSD Transparency: Adjust the transparency of the menus and system information that appears on the screen. Level "1" is the most transparent while the maximum level is the most opaque.
-
Banner display time: Adjust the time the banner appears on the screen when pressing the "INFO" button (18). This banner disappears after a specified interval of time. If the selected option is "Always", press "EXIT" (20) in your remote control to make the banner disappear.
-
Video output: Select the video output depending on the input of your TV ("CVBS" or "RGB"). The "CVBS" option is the more convenient in most of the situations.
- Video enhancement: You can enhance the image quality using this two settings. "Flesh tone" and "Black/White expansion". Select between "Switch on and off".
Password and parental control
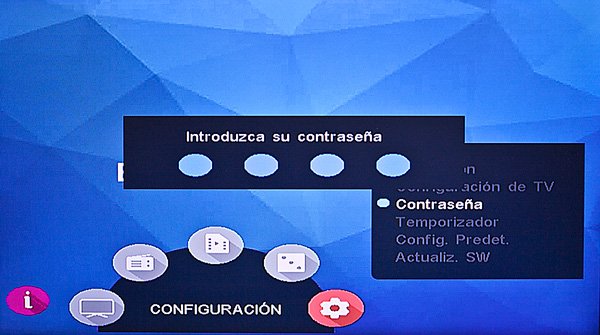
Set a protection by using a number password for the system's menu, the channels tagged as locked or TV programmes that exceed a certain level of censorship.
The default password is 6666. You can change it in the "Change password" section.
You can use the number button pad <0-9> (14) in your remote control each time your SD3 requests the password.
System's menu lock
It enables you to lock the "MENU" button (10) using a password in the remote control to access the settings and other options.
Channel lock
It allows you to lock the channels using a password. Each time you select a locked channel it will ask for the password to let you watch it. For more information about channel locking, go to the "TV list" section.
Censorship lock
Set the parental control rating for a programme, then it will ask for the password to watch it. The age rating information is shown by the channel (This information might not always be available and will depend on the localization or the channel) The options are:
- No lock: Password is not needed, no matter the rating of the programme.
- Total lock: Password always required, no matter the rating of the programme.
- 02-18: Password required when the parental rating of the programme exceeds the selected level.
Change password
Press "left/right" in your remote control to activate the password change. Use the number button pad <0-9> (14) to enter the old password. For security reasons, you must enter the new password twice. If you entered the data correctly an on-screen message appears advising that the password has been successfully changed.
Timer (events)
Your TDT SD3 allows you to turn the device on and display or record a TV channel with an automatic scheduled event.
You can schedule the recording or display of events manually or automatically through the TV/Radio Guide.
During the scheduled events you can press the Volume "VOL+/VOL-" (12) and Silence "MUTE" (9) buttons. If you press any other button, an on-screen message will ask you if you want to leave the scheduled event. You can display or edit the scheduled events by pressing the "REC LIST" (13) button.
Default settings
It allows you to restore to default settings if necessary.
Note: This operation restores all the settings made by the user to default settings, deleting the channel list.
Software update
It allows you to update the software of your TDT SD3 through an external USB device. You can check the available updates at http://www.energysistem.com/42510. Be sure that your USB device uses the FAT/FAT32 format in order to use it with your TDT SD3.
Troubleshooting
If you have any difficulties that you are not able to solve after reading this users manual and installing your DVB-T receiver, please consult the following troubleshooting chart with the most common problems:
| Problem | Cause | Solution | ||
|---|---|---|---|---|
| The front light of the device is off | The system is not plugged in | Check up if the power cable is plugged into the socket correctly | ||
| Signal not found | The antenna is off | Check up if the cable of the antenna is plugged into the socket correctly | ||
| The installation of the antenna has not been carried out correctly | Consult your technician | |||
| No DVB-T signal range area | Consult your technician | |||
| No image and no sound | Power cable (Europlug) not plugged in correctly | Check up that the SCART cable is correctly plugged into your tv | ||
| The device is not plugged in | Check up if the power cable is plugged in correctly | |||
| A black page is displayed on the teletext screen | Leave the teletext mode | |||
| No image, only sound | You have tuned in to a radio channel | If you want to see images, you need to tune in to a TV channel | ||
| Pixelated images | Antenna not positioned correctly or incomplete/damaged system | Consult your technician | ||
| I have placed the device in another room and now, the signal cannot be received correctly | The signal has lost power while going through a signal splitter | Consult your technician | ||
| Encrypted channel | You are viewing a channel that needs a decoder | Select another channel | ||
| I cannot watch some channels | You have tuned in to a channel in HD | Your TDT SD3 is a tuner that enables you to watch SD channels, change to the SD version of the same channel | You are trying to watch a locked channel | Change to an unlocked TV channel |
| Wrong password | You have entered a wrong password | Enter the correct password. If you have forgotten your password, you can enter the master password which is "1397" and change it later on for one of your choice. | ||
| The remote control doesnt work | The device is not plugged in | Check up the connections | ||
| The line of sight between the remote control and the device is not clear | Put away the objects that stand between the remote control and the device | |||
| The batteries of the remote control are not placed correctly | Check up that the batteries are placed correctly taking into account their polarity | |||
| The batteries of the remote control have run down | Replace them for new ones |
Warranty
Energy Sistem Soyntec S.A. is liable for any lack of conformity which exists at the time the goods were purchased during a period of 36 months.
This warranty covers any defects in workmanship or materials.
This warranty does not cover any failure of the product due to accidents, misuse or alteration made by an unauthorized person.
The special 36-months warranty is valid for the European Union. For other countries, please refer to the specific legislation or your local distributor.
Warranty Procedure
Visit http://www.energysistem.com/en/support and select your product to view the FAQ (Frequently Asked Questions), user manual, drivers and updates available, as the possibility to submit a query to the Technical Service or manage the warranty.
- You can check the availability of the user manual in your language at http://www.energysistem.com/guide/42510
- Alternatively, you may prefer to contact the distributor from which you purchased the product, presenting the purchase receipt or invoice.
Important: This warranty doesn't cover any damage or loss to any data stored in warranty products, therefore Energy Sistem's Technical Service will not assume any loss of the above mentioned information. So it is recommended to make a backup of your data and remove any data or personal data from its internal memory before you send the product, or to send it only with the original data. Specifications are subject to change without notice.
Trademarks
All company, brand and product names are trademarks or registered trademarks of their respective companies.
© 2015 by Energy Sistem Technology S.A. All rights reserved.
Notice: The present device could contain connections to other sites or websites operated by third parties not related to Energy Sistem Technology S.A. These connections are provided for your information or convenience; Energy Sistem Technology S.A is not responsible for their availability, content, update, adequacy or accuracy. These external connections might contain or link references to trademarks, patents, registered information, technologies, products, processes or rights property of other companies or individuals. All the rights reserved are property of their respective owners, and your are not granted with any license or right related to those brand names, patents, industrial secrets, technologies, products, processes or other rights property of other companies or individuals.
Declaration of conformity

Manufacturer name:
Energy Sistem Technology S.A.
Address: C/ Calpe, 1
03509 Finestrat Alicante (España)
Tel: 902 388 388 // Fax: 902 119 034
NIF: A53107488
We declare under our own exclusive responsibility that the product
Brand: Energy Sistem™
Model: TDT SD3
Manufacturing country: China
is in compliance with the essential norms and standards of the Directive 1999/5/EC of the European Parliament and of the Council of March 09th 1999. Other rights property of other companies or individuals. You may request a copy of the declaration of conformity at C/ Calpe, 1 - 03509 Finestrat - Alicante (España) Tel. +34 966 831 05
Finestrat, 27 May 2015.