
Introduction
Thank you for your trust in us and for buying the new Phone Neo 2. We hope you enjoy it.
Your new phone has a 4.5" IPS FWVGA (854 x 480 pixels) touch display with anti-fingerprint coating, Quad Core ARM Cortex A53 1.0 GHz processor, Bluetooth 4.0, Wi-Fi, GPS, 4G/3G connectivity, supports microSD up to 128 GB, front camera, rear camera with flash, powerful Xtreme Sound speaker and two interchangeable rear cases.
Before you start using your smartphone, we recommend you to read this manual and familiarize yourself with it. It will only take a few minutes and will help you enjoy your device with maximum performance.
Care and maintenance
- Do not expose your Phone Neo 2 to impacts, dust, direct sunlight, humidity or high temperatures for long periods of time.
- Do not use neither corrosive nor abrasive cleaning products.
- Keep the device clean and free of dust using a soft and dry cloth.
- Charge the battery when the display shows the low battery icon.
- Please do not dismantle the device. All reparation works should be carried out exclusively by qualified staff of Energy Sistem Technology, S.A.
Main features
DISPLAY
- 4.5" anti-fingerprint touch screen
- IPS FWVGA technology
- HD resolution (854 x 480 pixels)
PROCESSOR
- Quad Core ARM Cortex A53 1.0 GHz processor
- Integrated GPU Mali-T720 MP1
OPERATING SYSTEM
- Android#trade# 6.0 Marshmallow
CAMERAS
- 5 MP rear camera with autofocus and LED flash
- 2 MP front camera with 83.7º FOV.
MEMORY
- 1 GB RAM DDR3
- 8 GB internal memory further expandable via microSD-HC\/XC cards (up to 128 GB)
CONNECTIVITY
- 4G: 800\/900\/1800\/2600 MHz (FDD-LTE XX \/ VIII \/ III \/ VII BANDS)
- 3G: 900\/2100 MHz (WCDMA VIII \/ I BANDS)
- 2G: 850\/900\/1800\/1900 MHz (GSM BANDS)
- Bluetooth® 4.0
- WI-FI 802.11 b\/g\/n
- A-GPS
CONNECTIONS
- Dual microSIM
- MicroUSB 2.0 connection
- Audio Jack 3.5 mm with CTIA standard
BATTERY
- Battery capacity: 2000 mAh, Li-Ion battery
- Battery life: up to 128 hours on standby and 10 hours conversation time.
- Recommended features: AC \/ DC power adapter (Europlug, not included in the product). Input: 100-240 VAC 50-60 Hz. Output: 5 V 1 A
OTHER FEATURES
- Integrated 2 W Xtreme Sound Speaker
- Notification LED
- Motion sensor (accelerometer)
- Proximity sensor
- Luminosity sensor
- Integrated omnidirectional microphone
- 87.5 to 108 MHz FM radio with presets
- SAR rate: 0.716 (W\/Kg) at the head and 1.449 (W\/Kg) at the body (10 mm distance)
Product content
- Phone Neo 2.
- Two rear cases in different colours.
- Quick guide.
- Screen protector.
- USB cable.
- Rechargeable lithium battery.
General overview
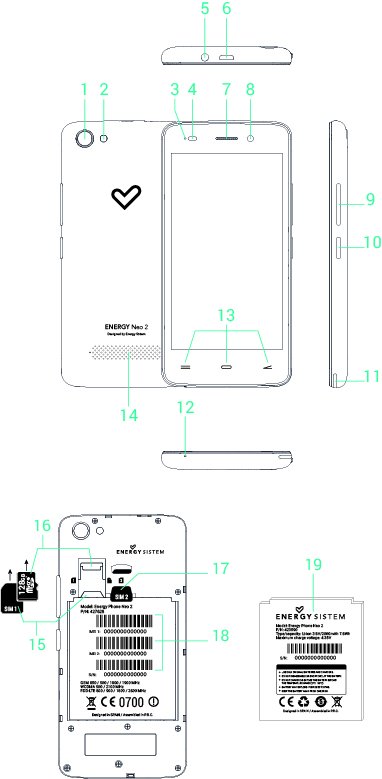
- Rear camera
- Rear flash
- Notification LED
- Proximity and luminosity sensors
- Earphones output
- MicroUSB input
- Receiver
- Front camera
- Volume button
- On/Off button
- Slot to remove rear case
- Microphone
- Touch buttons: Recent Apps, Home, Back
- Xtreme Sound speaker
- MicroSIM card slot 1
- MicroSD card slot
- MicroSIM card slot 2
- IMEI and serial numbers
- Battery
Charging the battery
Your Phone Neo 2 has a 2000 mAh battery. The charging time ranges from 2 hours and 30 minutes to 3 hours and 30 minutes, depending on whether the device is on or off. Always charge your phone through the USB cable that comes with the product to comply with the battery charging times. We recommend to use an AC / DC power adapter (not included in the product). Input: 100-240 VAC 50-60 Hz. Output: 5 V 1 A.
Switch on and off
Make sure that the microSIM card or both microSIM cards are inserted in their slots and that the battery is correctly placed (19) before turning on your Phone Neo 2. Press the On/ Off button (10) located on the right side of your device for one second. Once the operating system has loaded completely, please unlock the device to start using it. Proceed to enter the PIN number of your microSIM card and then drag the padlock upwards.
To turn off the device, press the On / Off button (10) until you see the power off menu and then, select "Switch off".
Briefly press the On / Off button (10) to lock/unlock the device thus, turning the screen on/off.
Main gestures
Basic gestures
- Tap
Touch the screen briefly

- Double tap
Touch the screen twice quickly

- Drag
Move your finger over the screen while maintaining continuous contact

- Slide
Slide your finger quickly over the screen

- Press
Touch the screen for an extended period of time

- Zoom
Zoom in and out the image on screen

Main screen
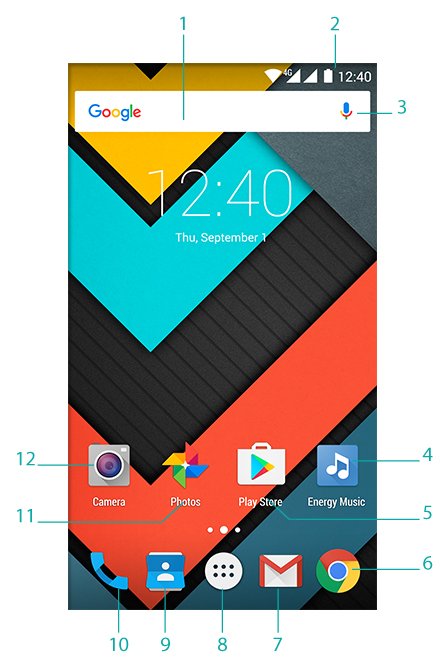
- Search: Direct access to Google's™ search engine.
- Status Bar: Displays information about the signal status, battery and clock. If you slide down your finger over this area twice, you will access the basic settings menu that manages notifications as well as the main settings menu.
- Voice Search: Access to Google's™ voice search and much more.
- Music: Music player.
- Play Store™: Download the best and most popular apps for your Android™ system.
- Internet: Web browser.
- E-mail: E-mail service.
- Menu: Access to the application and widget menu.
- Contacts: Contact management.
- Phone: Calls and call log.
- Gallery™: Image display.
- Camera: Access to the built-in camera.
Widgets
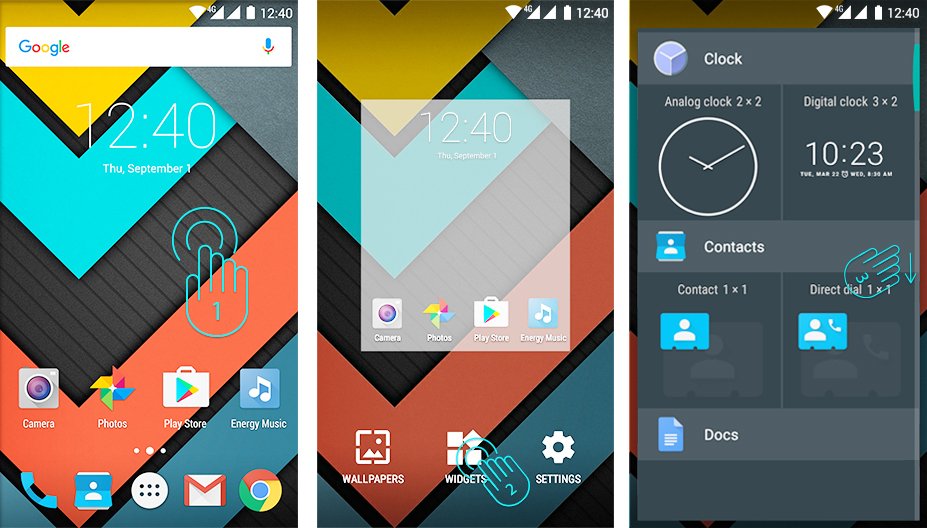
In order to add a Widget to one of your desktops, tap the centre of the desktop (1) and then, select "WIDGETS" at the bottom of the screen (2). You can slide your finger to the right (3) to see all your installed Widgets. Select the one you want to add to your desktop by keeping it pressed and then release it on the desktop.
Widgets can be easily removed or relocated to other screen areas. To relocate a widget, press it and keep it selected for a few seconds. Once the app has been highlighted, you can move it to another desktop position.
To remove the widget, keep it pressed for a few seconds without releasing it until the X icon appears on top of the screen. Then, drag the widget to that icon and release it.
SIM card settings
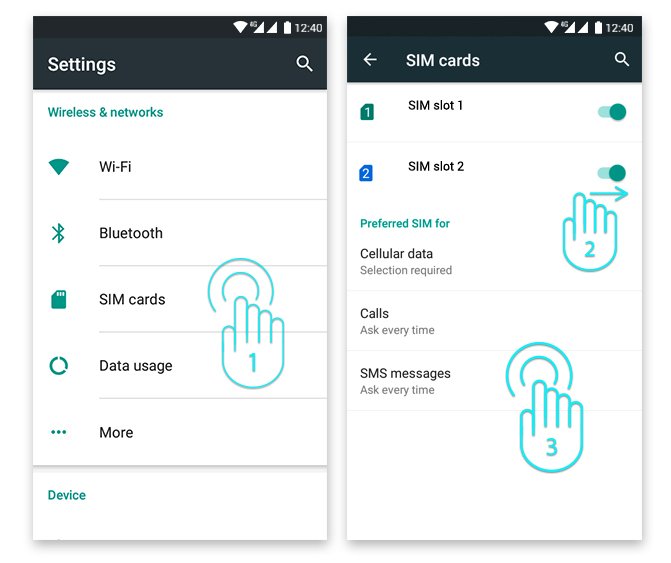
Your Phone Neo 2 allows you to use two microSIM cards. In Settings > SIM Management, you can manage the use of both cards.
In this section you can set the default card to make or receive calls, send and receive text messages and set the data connection.
Bluetooth setup
Your Phone Neo 2 has Bluetooth 4.0 to connect your device to headphones, computers, tablets or any device that supports such communication protocol. You just need to go to Settings > Bluetooth and turn the switch ON. Then, the device will start a search of all available devices and once it has finished, you will only have to select one of them to establish the connection.
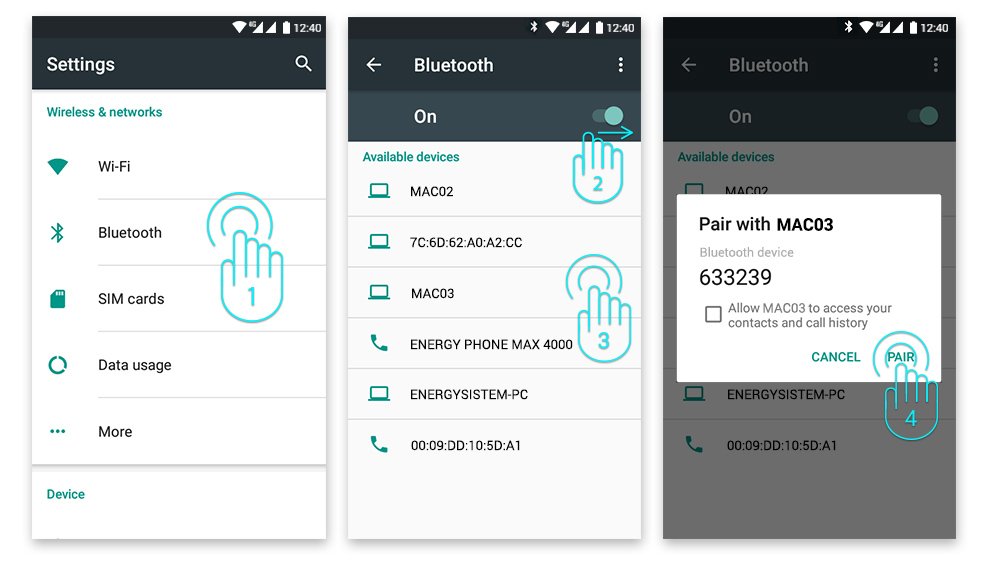
- Settings > Bluetooth.
- Enable the Bluetooth option.
- Select the device you want to connect to.
- Accept the pairing request.
Wi-Fi settings
Your Phone Neo 2 has Wi-Fi 802.11 b/g/n connectivity. To connect your device to any wireless network, please go to Settings > Wi-Fi and turn the switch ON. Then, the device will start a search of all available networks and you will only have to select one of them to connect your device.
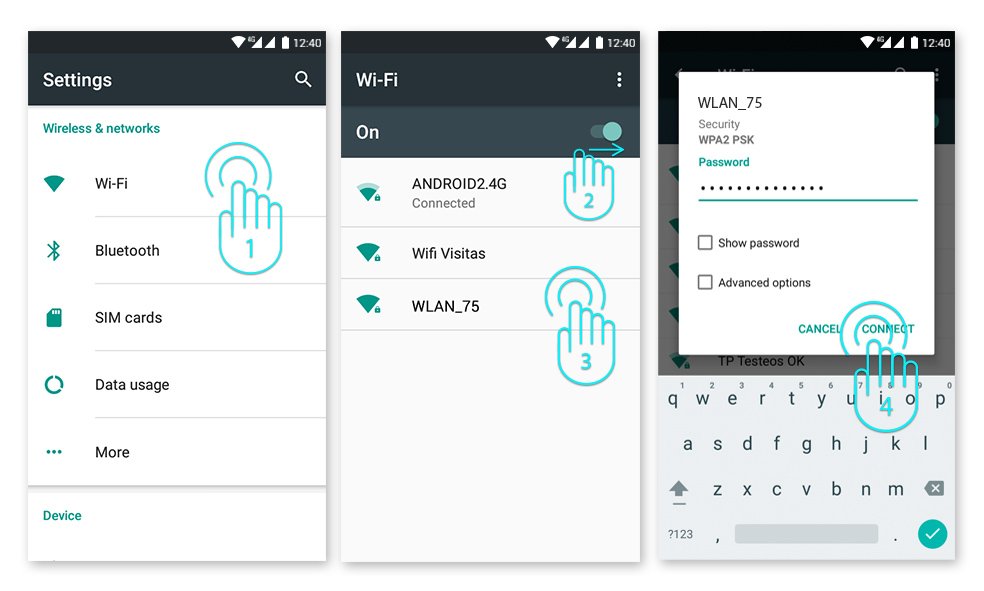
- Settings > Wi-Fi.
- Enable the Wi-Fi option.
- Select your Wi-Fi network.
- Connect.
Note: Your Phone Neo 2 is compatible with the following security and encryption standards: WEP, WPA, WPA2, TKIP and AES. Once you have completed the authentication process successfully, your Phone will save the Wi-Fi access data and your devide will be ready to access the Internet. The device will remember the network and will automatically connect to it whenever is available.
Internet browser
Your new Phone Neo 2 has a powerful web browser among the list of installed default applications. With it you will be able to surf the Internet smoothly and easily.
Once the device is connected to a Wi-Fi or 4G/3G network, press the browser icon on the desktop or in the application menu to start using it. The system will load and display the home page set by default.
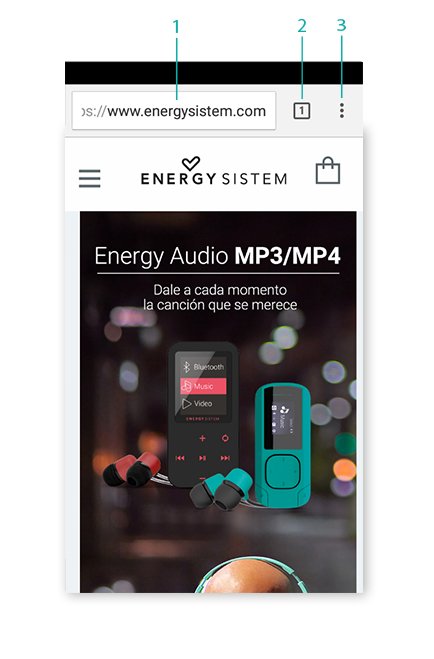
- URL address.
- Tab management.
- Browser menu.
E-mail settings
Note: In order to get to know your account settings, please ask your e-mail service provider.
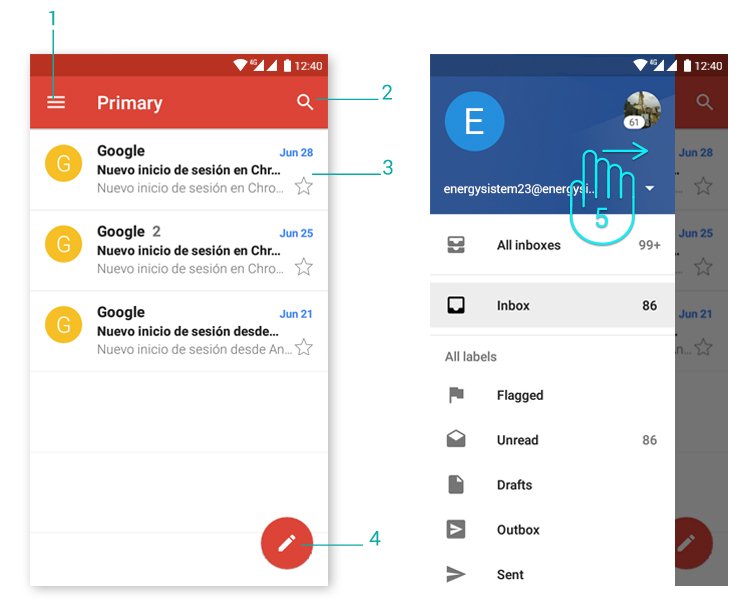
- Selected folder.
- Search.
- E-mails.
- New e-mail.
- Folders.
Music player
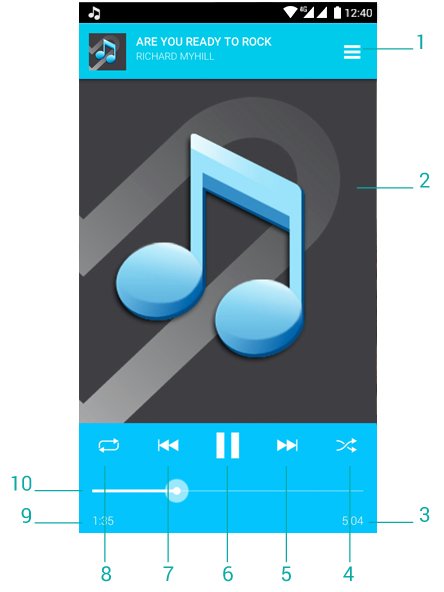
- Playlist.
- Display.
- Length.
- Random playback.
- Next song.
- Play / Pause.
- Previous song.
- Repeat.
- Elapsed time.
- Progress bar.
Video Player
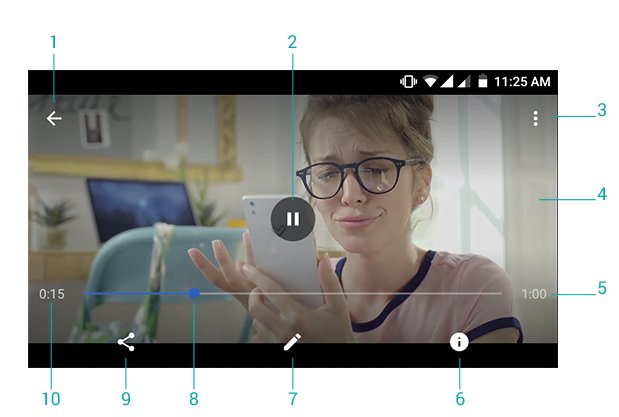
- Back to video list.
- Play / Pause.
- Options.
- Now playing.
- Length.
- Video details.
- Video editor.
- Progress bar.
- Share options.
- Elapsed time.
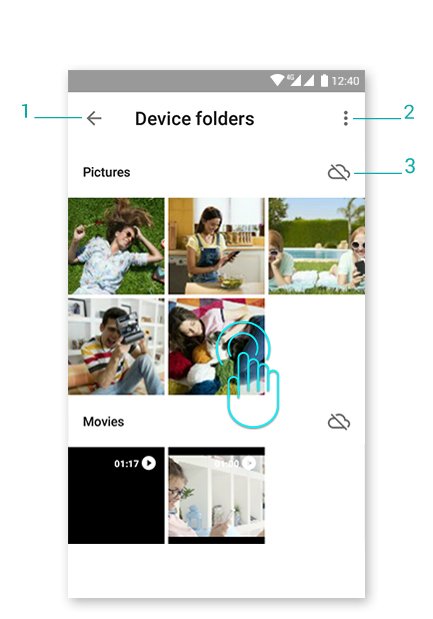
In order to access the folder list, press Device folders > Movies on the menu.
Camera
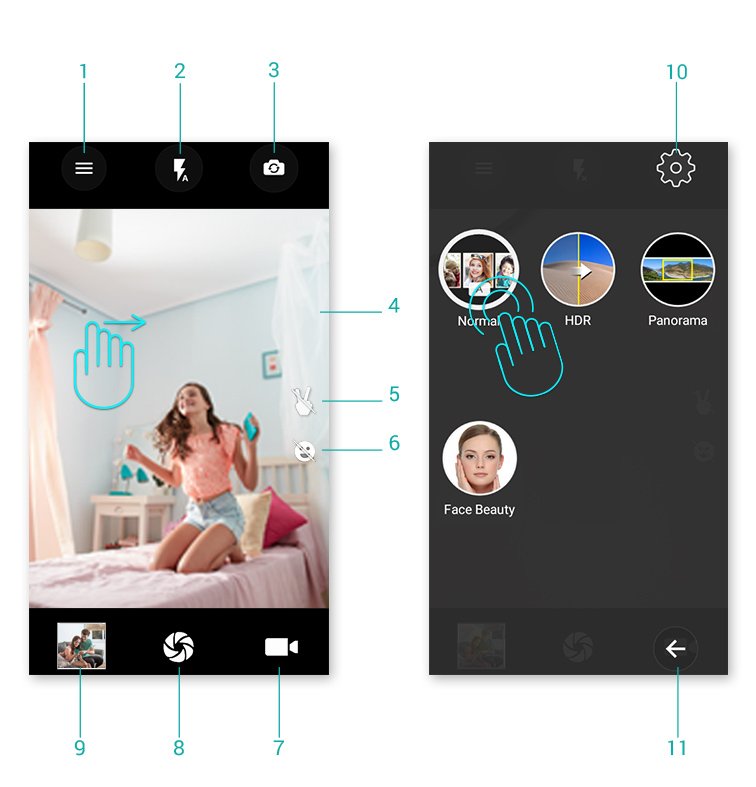
- Settings.
- Flash.
- Switch cameras.
- Camera preview.
- Automatic gesture recognition.
- Smile capture.
- Video mode.
- Shutter button.
- Access to gallery.
- Settings.
- Return.
Gallery
You will be able to view the pictures and videos stored on the device internal memory and your Google account.
- Return.
- Options.
- Backup and synchronization.
In order to access the folder list, press Device folders > Pictures on the menu.
To view the previous/next image or album, slide your finger horizontally.
To return to the main desktop, press the Back or Home button.
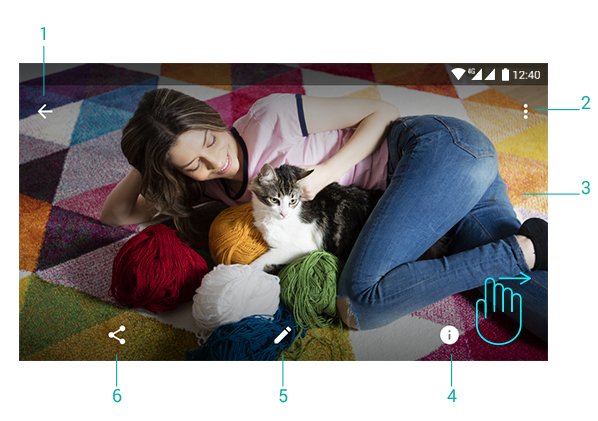
- Return to picture list.
- Options.
- Image.
- Image details.
- Image editor.
- Share.
MicroSD / USB
Your Phone Neo 2 has a slot for microSD cards to expand your device memory. To use it, turn off your device before inserting/extracting the card in order to avoid accidental data loss. It supports High Capacity (microSD-HC) and Extended Capacity (microSD-XC) card formats.
Additionally, your Phone offers you the possibility to choose between two possible microSD settings: microSD as portable storage unit and microSD as internal storage unit.
Please follow these steps the first time that you install your microSD:
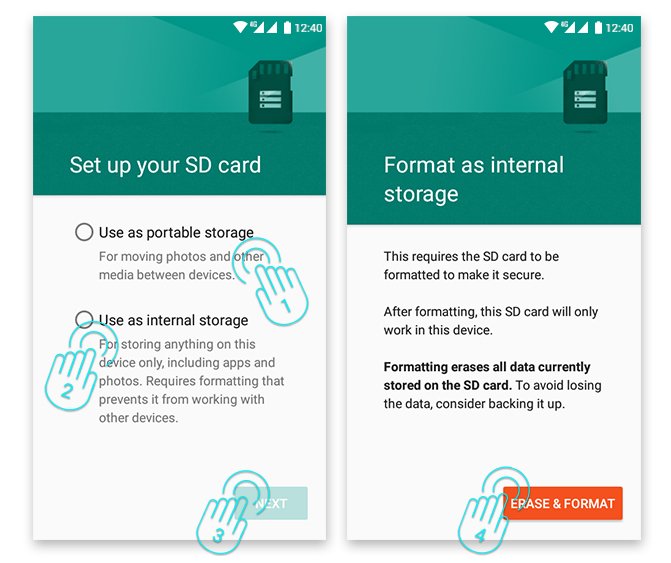
- Select this option if you want to use your microSD card as a portable storage unit.
- Select this option if you want to use your microSD card as an internal storage unit. Apps and multimedia content can be installed on your microSD unit but take into account that this won't be possible with all apps.
- Press "Next" once you have selected the preferred option.
- Erase and format MicroSD memory. At this point, all information stored on the MicroSD memory will be removed permanently.
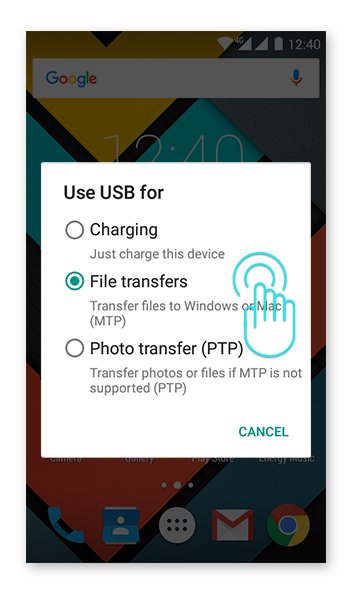
Your Phone also includes a microUSB port with HOST function. You only need to connect the cable that comes with the product to establish the connection and enjoy all mode functions.
Updates
Your Phone Neo 2 has an Android#trade# operating system that can be reinstalled or updated if necessary. Updates will be carried out via OTA (Over-The-Air) by default, so your Phone will automatically connect to our servers, download the file and install the new software as soon as an update is released.
You can also update your Phone Neo 2 using your PC. The process is simple but has to be done carefully and only when is really necessary. If the device does not respond, restarts unexpectedly or you experience problems accessing the content stored on the internal storage memory, you should reinstall or update the operating system to the latest compatible version available.
Please follow these steps to install it:
-
Make sure that the battery of your Phone Neo 2 is fully charged. If this is not the case, plug it to the external power source using the recommended AC\/DC power adapter and wait until it is fully charged.
-
Access the www.energysistem.com website on your computer.
-
Enter the "Support" section and choose "Smartphone" in the type of product.
-
Choose your Phone model from the dropdown list that appears and then download the latest Android#trade# operating system version available in the Download\/Firmware section.
Important: Please make sure the operating system version you are downloading is intended for your phone model and serial number, otherwise the device could be damaged.
-
Unzip the file on your computer.
- Open the text file of the download and follow the instructions to install the new operating system on your Phone Neo 2.
Troubleshooting
-
Why is not possible to play some MP3 files?
The MP3 file must follow the Layer 3 Standard for MPEG-1, MPEG-2 or MPEG 2.5 formats. Otherwise, it has to be converted using specific software. -
My Phone does not turn on, what can I do?
Make sure that the battery has enough charge when trying to turn it on. If the problem continues after charging the device for at least 30 minutes, there may be a problem with the installed operating system. Please, refer to the "Updates" section of this manual. -
Why is not possible to play some WMA files?
Make sure you are not trying to play WMA files with DRM. -
Why is not possible to display video files, images or text while using the music player?
In general, applications only display the files that are compatible and that the programme is able to read. Therefore, you will only be able to display the files with the format that is compatible with that programme (songs with the music player, videos with the movie player, etc...) while you browse the folders of that specific application. In order to see all the files stored in the internal memory at the same time, start the file explorer application from the application menu. -
Which video formats are compatible with my Phone?
Your Phone can play several video formats like MP4, 3GP or MOV among others without needing to recode. -
Why is not possible to display my jpg images?
Many digital cameras and image editing software add hidden data to jpg files. This can prevent your Phone from loading the images. Try deleting them and save the images with other name. -
Sometimes the screen turns black and the device does not respond.
It is always better to restart the device through the available system options but if this is not possible, take out the battery, place it once again in place and switch on the device. -
The built-in memory of the Phone Neo 2 is 8 GB but the available memory is lower than that. Why?
Its Android#trade# operating system and the preinstalled applications need approximately 3 GB internal memory to work properly. Therefore, the internal storage capacity available is less than 8 GB. -
What do I have to do to install an application that is not in Play Store#trade#?
First of all, make sure that the file has the Android#trade# application extension (.APK). Then, Android#trade# will ask you to activate the app installation from the "Unknown sources" option, which has been disabled for security reasons. To enable the installation of apps, you only have to follow the instructions on screen the first time you try to install an application: Settings \/ Security \/ Unknown sources (activate). This action may compromise the device security. Therefore, we strongly recommend to install applications from reliable sources only. -
How long does the battery last?
It depends largely on how you use the device, that is, how high you set the level of screen brightness, the use of headphones or speakers, the Wi-Fi connection and the use of GSM and 4G\/3G networks. The battery life of the Phone Neo 2 lasts up to 128 hours on standby and 10 hours in conversation. - Which are the bands that my device needs to work on 4G\/3G mode? Your Phone Neo 2 is prepared for FDD-LTE 800\/900\/1800\/2600 MHz bands to work on 4G mode and for WCDMA 900\/2100 MHz bands to work on 3G mode.
Safety precautions and SAR
Safety precautions
It is prohibited to use the phone in certain places such as airplanes, hospitals, service stations and garages.
To reduce the amount of radiation, use a hands-free kit, the speaker mode, a Bluetooth headset and do not make calls in places where the signal is weak, in the car, train or subway. Keep the phone away from sensitive areas like the belly of pregnant women, especially when making a phone call. If you have an electronic implant (pacemakers, insulin pumps, neurostimulators...) place the phone at least 15 cm from the body and on the opposite side to the implant when making a phone call.
The power socket that you intend to use to charge the device battery should be easily accesible. You must place the device close to it.
Exposure information (SAR)
This device complies with the guidelines developed by the ICNIRP for exposure to radio waves. The unit does not exceed the SAR radio wave exposure limits. This unit measures the amount of radio energy absorbed by the body when using a device. The SAR limit adopted by Europe is 2.0 W/kg averaged over 10 grams of tissue. The test performed showed that the highest SAR value for this device when using it near the ear/head is 0.716 W/Kg.
Warranty
Energy Sistem Technology, S.A. is liable for any lack of conformity that exists at the time the goods are purchased during a period of 36 months. Batteries are excluded from the 36-month warranty, having a warranty period of 24 months.
This warranty covers all defects in workmanship or materials. This warranty does not cover product failures due to accidents, misuse or alteration made by an unauthorized person.
The special 36-month warranty is valid for the European Union. For other countries please refer to the specific legislation or your local distributor.
Warranty procedure
Visit the Support section at http://www.energysistem.com/en/support and select your product to view the FAQ (Frequently Asked Questions), user manuals, drivers and updates available. You will also have the possibility to submit a query to the Technical Service or manage the warranty.
-
You can check the availability of the user manual in your language at: http://www.energysistem.com/guide/42762
- Alternatively, you may prefer to contact the distributor that sold the product and present the purchase receipt or invoice.
Important: This warranty does not cover any damage or loss of data stored on warranty products. Therefore, Energy Sistems Technical Service will not assume any loss of the above mentioned information. It is recommended to make a backup of your data and remove this information from the device internal memory before sending the product, or sending it only with the original data.
Specifications are subject to change without notice.
Trademarks
All company, brand and product names are trademarks or registered trademarks of their respective companies.
© 2016 by Energy Sistem Technology, S.A. All rights reserved.
NOTE: The present device could contain links to other sites or websites operated by third parties not related to Energy Sistem Technology, S.A. These links are provided for your information or convenience; Energy Sistem is not responsible for their availability, content, update, adequacy or accuracy. These external web sites might contain or link references to trademarks, patents, registered information, technologies, products, processes or rights property of other companies or individuals. All rights reserved are property of their respective owners and you are not granted any license or right related to those brand names, patents, industrial secrets, technologies, products, processes or other rights that are property of other companies or individuals.
Declaration of conformity

Issuers name: Energy Sistem Technology, S.A. CIF: A53107488
Address: C/ Calpe, 1 - 03509 Finestrat - Alicante (Spain)
Tel: + 34 902 388 388 / + 34 966 813 257
We declare under our own exclusive responsibility that the product:
Description: Smartphone
Brand: Energy Sistem
Model: Phone Neo 2
Manufacturer: Energy Sistem Technology, S.A.
Manufacturing Country: China
referred to in this declaration is in compliance with the essential norms and standards
1999/5/EC-R&TTE
EN 60950-1:2006+A11:2009+A1:2010+A12:2011+A2:2013
EN 50332-2:2013
EN 50360:2001+A1:2012; EN 62209-1: 2006; IEC 62209-1: 2005;
IEC 62209-2:2010; EN 62209-2:2010; EN 50566:2013; EN 62479:2010
EN 301 489-1 V1.9.2; EN 301 489-3 V1.6.1
EN 301 489-7 V1.3.1; EN 301 489-17 V2.2.1
EN 301 489-24 V1.5.1
EN 55022:2010/AC:2011; EN 61000-3-2:2014;
EN 61000-3-3:2013; EN 55024:2010
EN 301 511 V9.0.2
EN 300 328 V1.9.1
EN 301 908-1 V7.1.1; EN 301 908-2 V6.2.1
EN 300 440-1 V1.6.1; EN 300 440-2 V1.4.1
in conformity with the essential norms and standards of the Directive 99/05/CE of the European Parliament and of the Council of March 09th 1999.
Finestrat, 01st September 2016.

Daniel Havillio
Product Management Director